
Step-by-Step Instructions
1. Preheat and Prepare
Preheat your oven to 350°F (175°C).
Line two baking sheets with parchment paper to prevent sticking and make cleanup easy.
2. Make the Cookies
Cream Butter and Sugar: In a mixing bowl, beat the softened butter and sugar until light and fluffy (about 2–3 minutes).
Add Vanilla: Mix in the vanilla extract for a rich flavor base.
Incorporate Dry Ingredients: Gradually add the flour and salt, mixing until a smooth dough forms.
Shape the Cookies: Roll the dough into small balls (about 1 tablespoon each) and flatten slightly onto the prepared baking sheets. Use a small round cutter or bottle cap to create a hole in the center of each cookie.
Bake: Bake for 10–12 minutes, or until the edges turn golden brown. Allow the cookies to cool completely before adding the topping.
3. Prepare the Topping
Toast the Coconut: Spread shredded coconut on a baking sheet and toast in the oven at 350°F for 5–7 minutes, stirring occasionally, until golden brown.
Make the Caramel Mixture: In a saucepan, heat the caramel sauce and heavy cream over low heat, stirring until smooth. Remove from heat and stir in the vanilla extract and toasted coconut.
4. Assemble the Cookies
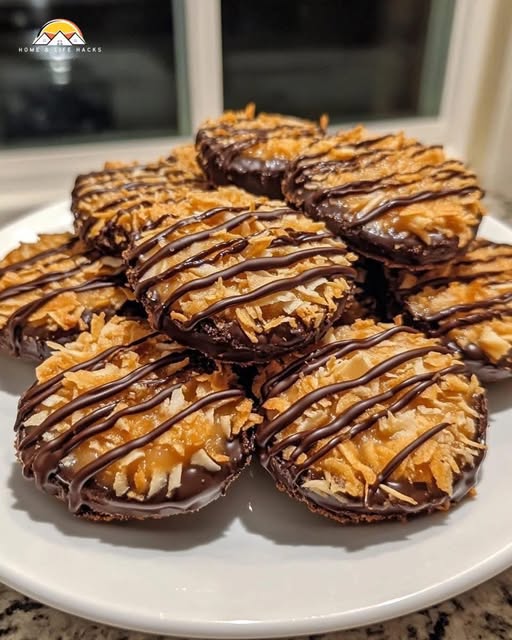
Spread the Topping: Spoon the caramel coconut mixture over each cooled cookie, covering the tops generously.
Melt the Chocolate: Melt the chocolate chips in a microwave-safe bowl in 30-second intervals or over a double boiler until smooth.
Dip and Drizzle: Dip the bottoms of the cookies into the melted chocolate and place them back on parchment paper. Use a spoon or piping bag to drizzle additional chocolate over the tops for a finished look.
—
Tips for Perfect Samoas
1. Use Quality Ingredients: High-quality chocolate and butter will elevate the flavor of your cookies.
2. Avoid Overbaking: Keep an eye on the cookies while baking to ensure they remain tender.
3. Work Quickly with Caramel: The caramel topping can harden as it cools, so assemble the cookies promptly.
—
Creative Variations
1. Gluten-Free Samoas: Substitute the all-purpose flour with a gluten-free baking blend.
2. Vegan Samoas: Use vegan butter, dairy-free caramel, and dark chocolate.
3. Mini Samoas Bites: Create smaller, bite-sized versions for portion control and easy snacking.
4. Peanut Butter Twist: Add a drizzle of peanut butter to the topping for a nutty flavor.
—
The Science Behind the Layers
The magic of Samoas lies in their layered construction:
Shortbread Base: Provides a sturdy foundation with a delicate crunch.
Caramel Coconut Topping: Adds sweetness and texture.
Chocolate Coating: Completes the cookie with a smooth, rich finish.
—
Serving and Storing Your Cookies
Serving Suggestions
With Coffee or Tea: Samoas pair beautifully with a hot beverage.
As a Dessert Topping: Crumble over ice cream for an indulgent treat.
Storage
Store in an airtight container at room temperature for up to 5 days.
For longer storage, freeze the cookies in a single layer and thaw at room temperature before serving.
—
Frequently Asked Questions
1. Can I use pre-made shortbread cookies?
Yes, using pre-made cookies saves time and still delivers delicious results.
2. How do I prevent the caramel from sticking to my hands?
Lightly grease your hands or use a spoon to spread the caramel mixture.
3. Can I use unsweetened coconut?
Yes, but the overall sweetness may decrease slightly.
—
Nutritional Information (Per Cookie)
Calories: ~180
Carbohydrates: 20g
Protein: 2g
Fat: 10g
—
Why Homemade Samoas Are Worth It
While store-bought Samoas are undeniably convenient, homemade versions offer unparalleled freshness and the satisfaction of creating something from scratch. Plus, you can customize the recipe to suit your preferences, making it perfect for any occasion.
—
Final Thoughts
Homemade Samoas Girl Scout Cookies are a labor of love, combining buttery shortbread, rich caramel, toasted coconut, and luscious chocolate into one irresistible treat. Whether you’re recreating childhood memories or sharing these cookies with loved ones, this recipe is sure to become a household favorite.
Gather your ingredients, preheat your oven, and let the baking begin. These cookies are more than a dessert—they’re an experience!
